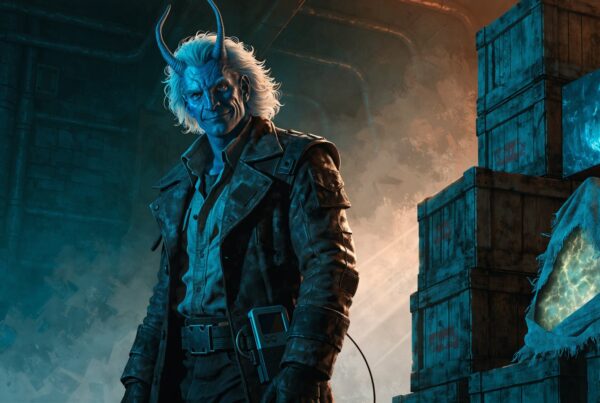
Meet Sesha
Sesha is a common Science officer in Star Trek Fleet Command, part of the Outlaws crew that orbits Harry Mudd. She’s the selten specialist who doesn’t try to do everything. Her whole kit fires only when she’s looking at an Eclipse target, and that focus makes her one of the easiest cheap Offiziere to slot into an anti-Eclipse hostile crew or Eclipse Armada lineup.
If you’re new to her, the short version: put Sesha in the captain seat to soften Eclipse crit chance, or bridge her to spike your own crit damage against Eclipse hostiles. The two abilities cover different sides of the same fight.
Background
Sesha is original to STFC. She isn’t a character from any Star Trek series or film, so there’s no Memory Alpha entry to look up. (There’s a Voyager character named Seska, spelled differently, who’s a completely different person; don’t conflate them.) Sesha was added with the Outlaws content as part of Harry Mudd’s small crew of rogues.
In-game, the flavor text describes her as a cunning, somewhat scatterbrained Outlaws crew member who spent much of her adult life being experimented on. The experiments gave her accelerated cell regeneration. She reads as warm and disarming on the surface, with hints in the lore that something more manipulative sits underneath. It’s useful texture for a character built to harass Eclipse targets.
Sesha’s role in STFC
Sesha is a single-purpose officer with two single-purpose abilities. Both her Captain Maneuver and her Officer Ability only do anything when the opponent is an Eclipse hostile or an Eclipse Armada target. Against anything else, she sits as crew filler.
That sounds limiting, and it is. But Eclipse hostiles and Eclipse Armadas show up across a real chunk of progression and event content, so a cheap, gemeinsame officer that helps in both stays useful. She doesn’t compete with your strongest officers for slots in normal PvE or PvP; she shows up when Eclipse content does.
Class-wise she’s Science, and her synergy group is the Outlaws (Mudd's Unternehmen in the in-game UI). That group has its own class-synergy bonuses, which matters when you build the rest of the bridge around her.
Captain ability: Always on Guard
Always on Guard gives Sesha a 20% chance to reduce an Eclipse hostile’s Critical Hit Chance by 15%. The effect covers Eclipse Armadas, which is the more interesting application. The captain seat in an armada drives the whole armada’s bonus, so even at lower ranks Sesha’s defensive proc has reach.
Those numbers are as of the latest data. The captain ability isn’t structured for a clean per-rank table the way the officer ability is, so treat the 20% chance and 15% reduction as the safe baseline to plan around. Promotions improve a few side properties; the headline numbers are what you crew for.
This is a defensive captain seat. It pairs naturally with armada-anchor ships and with crews that already hit hard, because reducing the enemy’s crit chance doesn’t help you swing a fight if you weren’t taking heavy damage in the first place. Think of her captain seat as insurance, not muscle.
Officer ability: Intimidation
Intimidation is the half of her kit you actually build around. For the first three rounds of combat against an Eclipse hostile or Eclipse Armada target, Sesha increases the ship’s Critical Damage Bonus. The bonus scales with promotion.
Per-rank values, current as of the latest game data:
| Rang | Critical Damage Bonus vs Eclipse |
|---|---|
| 1 | +20% |
| 2 | +30% |
| 3 | +50% |
| 4 | +70% |
| 5 | +90% |
That’s a clean, monotonic progression confirmed by two independent sources, so the table is reliable for now. The catch is the three-round window. If your Eclipse fight runs longer than three rounds, the bonus stops carrying you in the back half, so Sesha rewards crews that finish fast.
The other catch is the conditional. Critical Damage Bonus only matters when you actually land a crit. Pairing Sesha with officers who raise your own Critical Hit Chance makes Intimidation hit much more often, which is why she scales well alongside crit-focused captains.
Where Sesha shines
The three situations where she earns a slot:
- Eclipse hostile farming, when you’re grinding the Outlaws arc or chasing event milestones tied to Eclipse kills.
- Eclipse Armada anchor crew, where the captain ability reaches the whole armada and the bridge ability pushes the anchor ship’s crit damage.
- Cheap budget anti-Eclipse crews for newer or mid-game players who don’t have higher-rarity Outlaws officers yet.
She isn’t a meta crew piece outside Eclipse content. Don’t run her on a hostile-grinding crew for Klingonisch or Romulan space, and don’t expect her to help in PvP unless your opponent is somehow Eclipse-tagged, which is rare.
How to get Sesha
Sesha is common rarity, so her shard cost to promote is modest by STFC standards. Common shards are cheaper to come by than Uncommon, rare, or epic shards, which makes her one of the lower-friction Outlaws officers to rank up.
For specific shard sources, check the current Rogue / Outlaws faction store and active event rotations in-game. Common Outlaws officers tend to circulate through Battle Pass tracks, Outlaws-themed events, and the faction store, but the exact current offering shifts month to month. The in-game store screen is the source of truth.
Crew synergies
Two crew-building ideas line up well with Sesha’s officer seat.
First, pair her with a captain whose ability raises your ship’s Critical Hit Chance. The more often you crit against Eclipse, the more often Intimidation’s damage bonus actually triggers on hits. Officers built to push crit chance up are her best partners on the bridge.
Second, in an Eclipse Armada you can run her in either seat: captain to soften incoming crits across the whole armada, or bridge to amplify the anchor ship’s crit damage. Most players get more out of putting their highest-promoted Sesha in the bridge for the damage bonus and using a more aggressive captain in the front seat.
Her Mudd’s Company synergy group also picks up class-synergy bonuses when the rest of the bridge is balanced across the three classes. You don’t need to memorize the percentages to crew her well; the practical takeaway is that a mixed-class bridge gets more out of the synergy than a single-class bridge.
Frequently asked questions
Is Sesha worth ranking up?
If you fight Eclipse content with any regularity, yes. Her promotion track is cheap because she’s common, and the gap between rank 1 (+20% crit damage) and rank 5 (+90%) is meaningful. If you don’t touch Eclipse content, she can stay at rank 1 until the next Eclipse event lands.
What ship is Sesha best on?
She fits any ship you’re already using to fight Eclipse hostiles or Eclipse Armadas. Players often put her on a fast hostile-grinding ship at lower levels and on an armada anchor at higher levels. There’s no Sesha-specific ship.
Where do Sesha shards come from?
Check the current Outlaws / Rogue faction store and the active event rotations in-game. Common Outlaws officers tend to appear across Battle Pass tracks and event milestones, but the exact rotation moves around. The live store screen is the source of truth; don’t trust an old guide on this.
Can Sesha be used outside Eclipse content?
Not productively. Both her abilities check for an Eclipse target before they fire. Against any non-Eclipse opponent she contributes nothing from her two abilities, although her presence still counts toward Mudd’s Company class-synergy if the rest of the bridge benefits.
Is Sesha better than Gaila in an Eclipse Armada?
They do different jobs. Gaila reduces hostile critical hits more broadly, and stacking Gailas in an armada can effectively zero out enemy crit chance. Sesha’s captain seat reduces Eclipse crit chance specifically, by a fixed amount on a 20% proc. Her real value sits in the officer seat as a crit-damage amplifier. Most experienced players run Gaila in the captain seat when she’s available and slot Sesha into the bridge to push crit damage.
Bottom line
Sesha is a focused, cheap tool for Eclipse content. Captain seat for armada defense, bridge seat for crit damage on Eclipse hostiles and armadas, and a quick promotion track because she’s common. If Eclipse content is in your daily loop, she earns the slot. If it isn’t, leave her at rank 1 and come back when the next Eclipse event rolls around.